Friday 2 November 2012

When someone else's work is so amazing it makes you want to weep...! Introducing Pam McDonald

It is shocking how long it has been since my last post, but we have been very busy in the shop, as those of you who receive the newsletter or follow us on Facebook will know. 

I 'go through all the details now, suffice to say that I am making a November resolution to be more attentive to this poor old blog! Today I have decided to share a piece of work by one of our customers (who also happens to be teaching at the shop in a few weeks) - Pam McDonald.

I would usually put pictures of customer's work up on the Facebook page with a few sentences to describe it, but I think this one needs a little more room than that!

This piece of work is called Sylvia's workbox and is a very personal piece of work as it was created from the sewing box given to Pam when her friend Sylvia passed away.

Sylvia was a teacher, a mother and a prolific sewing, and Pam has used elements from that work box to capture those elements of Sylvia's life and character on canvas. I have to say that when Pam bought it into the shop on Wednesday that it brought the place to a standstill. We all stood around in open-mouthed wonder at this piece of art and the sheer ingenuity of what went into it.
 The attention to detail is astounding - I loved the use of the of old needles in the centre of the flowers,  as well as the rows of pins. So imaginative!

The layers of work, and of meaning, encourages you to look deep into the canvas as well as deep into a life.
 The more you looked - the more you see!

This piece of work was recently exhibited at the Embroiderers Guild exhibition in Peterborough - and I am sure it caused quite a stir! It will eventually be given to Sylvia's son - and very lucky he will be!

 If you want to see more about Pam, you can visit her blog which I am a big fan of (as you probably guessed!) or join her here at Bee Crafty on Friday 9th November to have a go at making some stunning embroidered buttons.
 

Enjoy!

Sarah

Sunday 22 April 2012

Tutorial - Laptop or Camera case

This weekend I have been on a "make-fest" - enjoying the opportunity to make some useful bits and pieces! Paul wanted something to put his camera in, and my netbook was looking a little dull! So I got the sewing machine out and came up with these goodies and we are both delighted.

So being a helpful little Bee I thought I would share them with you!

This pattern can be used to make a case for a camera, a netbook or a laptop. This is not strictly a sleeve, because they tend to be much larger than they need to be in order to accommodate the depth of your tech!

It is also reversible if you don't add a fastening!

Requirements:

A piece of wadding,
one piece of fabric for the inside
one piece of fabric for the outside of your bag (measurements dependant on what you are 'bagging')
co-ordinating thread

sewing machine
iron and ironing board
sewing kit
pins

Step 1 - measuring your fabric

Whatever you are planning to 'bag up', you will need to measure the contents to work out how much fabric you need. Measure all three dimensions - height (H), width (W) and depth (D). Make sure that you measure to the widest part, for example you would measure the depth to the end of the lens on a camera.

This next bit sounds complicated, but it ensures that your fabric goes around your item completely plus a bit for the flap!


My camera  measured 4inches wide (W), 3inches high (H) and 2inches deep (D), You will need to cut the width of your fabric to W + 1 inch wide (so mine was 5inches wide).

The length of the fabric should go all your tech and overlap at the front. The length of the fabric needs to be 2.5 x H plus 2 x D plus 1inch seams allowance. So mine was 2.5 x 3 + 2 x 2 + 1 (12.5 inches).

So my piece was 5x12.5 inches.

Step 2 - preparing the outside of the bag

You will need to cut 1 piece of wadding to the exact measurements calculated in step 1. The finished piece looks better if the flap has a nice curve, so fold your wadding in half lengthwise and use something round to draw around and cut out your curve - I use my favourite Dr Who coffee mug!

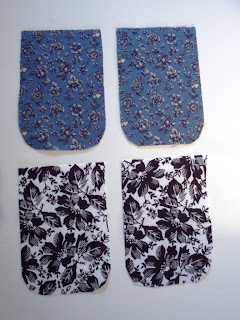
Cut your two pieces of fabric so that they are slightly larger than the wadding. Place your two pieces of fabric right side together and place the wadding on top as shown below:

Sew all the way around the wadding using a 1/4 inch seam allowance, leaving a gap in the stitching along one side so that you can turn the whole thing inside out later.

Trim the fabric to the same size as the wadding. Snip the fabric around the curve ensuring you don't cut through the stitching. This will make the fabric lie flat once it is turned inside out.

Pull the fabric through the gap you left open.

 Turn the opening in and press flat.
Over sew all the way around as close to the edge as you dare using a coordinating thread. This will close the opening and gives a neat and professional finish.
Now that's the outside of your bag completed.

Now your tech is not flat, so we need to add sides to our bag.

Step 3 - create edges


Return to your earlier measurements and cut 2 pieces from each fabric that measure H plus 1/2 inch by D plus 1/2 inch. So mine was 3.5inches by 2.5 inches. Curve the bottoms of each piece.

Place one of each fabric right sides together and sew almost all of the way around, leaving a gap to pull it the right side out after snipping the curve and trimming the corners. Once it is turned the right way out, press flat and repeat until you have 2 sides.

Step 4 - sew it all together


You have a choice here - you can pin the sides in place and slip stitch it to the sides:
or you can be a little more adventurous and sew it with your machine.

The sewing machine method works better without pins! Sew from the top of the bag and follow the line of your previous top stitch. Slowly feed the two pieces through the sewing machine turning it carefully as you go.

Repeat for both sides and then press.

The netbook case did not need a fastener, but a smaller bag like the camera case would probably benefit from the addition of a popper or a simple Velcro fastener!

Step 5 - show off!


Now admire your new tech bag and make sure everyone else gets the chance to admire it!

Best wishes

Sarah


Tuesday 21 February 2012

We love to shop!

Well we have had a very busy weekend with 2 days at the Craft Hobby & Stitch trade show at the NEC. As we are unable to resist a bargain, we managed to blow twice our budget and thoroughly enjoyed doing it!

There is no danger of us keeping quiet about our purchases once they arrive here in Ellington, but I don't want to let the cat out of the bag quite yet, except to tease you with the following... Julie was completely bowled over by some french vintage fabric from (you've guessed it) France so we bought 6 in a red and 6 in a blue colourway. I also got to play by ordering our first range of Delica Beads which will be here within the next few weeks and I have to say that I am hoping from one foot to the other with excitement!

I cant wait to get to get my hands on them and come up with some classes. We are also increasing our range of seed beads, especially as our seed bead classes are increasing in popularity!

So we can make room, we have also decided to run a Sweet Deal - with a range of fabric for £7 a metre. Just the ticket for a backing or something to add to your stash.

So now we have fed our need to shop, we can let you feed yours! We will share more as they arrive and feel free to drop by and take a look!

Best wishes

Sarah


Tuesday 7 February 2012

It's all go here...

Since returning from the (well deserved) Christmas break, there has been plenty going on here at Bee Crafty. We have had some great classes with the lovely Helen Coverley (effectionately known as the Bag Lady) joining us. She has already done one bag class,  with a bunch of imcredibly happy bag beginners! Look what they came up with...
She will also be doing a "project bag" class with us  at the end of March which we are all fighting to go on! At last - somewhere to keep all thoses "bits" for classes!!!

She will also be doing a jelly roll class with a choice of patterns which I am sure will be equally popular!

We have had a lot of ladies coming in with projects they have completed with stuff bought from the shop...


Sue knitted up this adorable little baby jacket with our King Cole Riot Chunky - someone will be a very lucky baby!

Pauline finished her Sudoku squared block she made with Jenny Rayment and turned it into a fabulous cushion. Well done Pauline!

Trish went all co-ordinated and made our Art Deco into a matching bag, scarf and belt. She was lucky to escape that day as everyone wanted to steal them!
Beryl brought in her beautiful cardigan made with our King Cole Romano wool in greys and purple and we were all green with envy!

Our magazine swap has proved so popular  it is taking over the tables! Swap for free or simply take one and put 10p in our charity box! Bargain!!!


We have also been getting new stock in the shop, as we now stock a range of bag handles, fleece backing and some extra wide fabric for those large projects. We were beginning to groan at the seams so we called in teh help of my over helpful Dad Julian and he rustled up some new units!

He built them down both side of the bar, and we immediately filled them! Crikey!

But just when you think the shop is full, we go and order MORE stuff! The next thing to come with be our new range of Kaffe Fassett fabrics, and the excitement in here is growing. I have my name down for 1/2 metre of each already!

best wishes

Sarah